Paper Plate Grinch

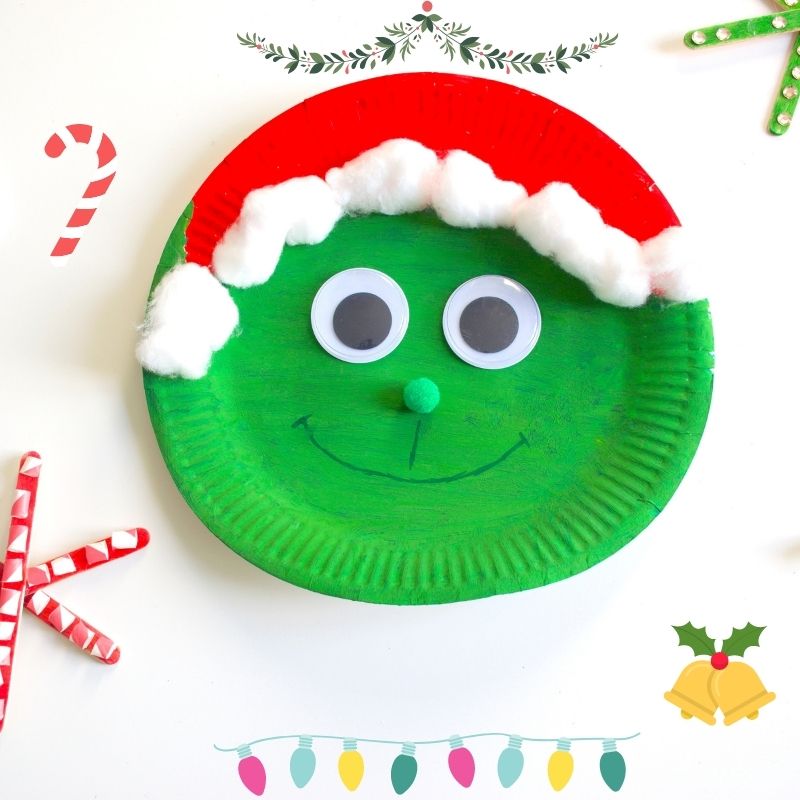
Still wondering how the grinch stole christmas? You can watch or re-watch the movie to find out. In the mean time, this Paper Plate Grinch Craft will do.

This is a fun christmas craft is just ideal for kids 3 years and above to get stuck in. Even better if they have seen the movie, this will be even more fun to make because its a character they recognise.

This Grinch Paper Plate Craft has no cutting or scissor handling. You will however, be painting so get your paint and brush out. The Grinch’s Santa hat is painted red while the face is painted green.

If like me, you don’t have a green paint left out of your colours, you can always mix a blue and yellow to make green.

https://youtu.be/WhqeUoV5DdE

How to Make a Grinch Paper Plate Craft

Materials needed

Instructions

  1. Using a marker or pencil draw a quarter moon shape at the top of the plate. This will be painted as Santa’s hat.
  2. Squirt out some  red and green paint in a palette. Paint the the top part red and then the rest should be painted green. Let the paint dry thoroughly.
  3. Apply pva glue to the lower edge of the part painted red. Also apply glue to the tip on the left hand side. Leave for a minute.
  4. This paper plate grinch needs a Santa hat. Now, fluff out some cotton wools and arrange them on the glue to resemble  hat.
  5. Give the Grinch some eyes. Take two big google eyes and glue them on the paper plate. Also take a mini pom pom and place under the eyes. Then finally, use a marker to draw the mouth. You can draw a smile or a frown.

Your Paper Plate Grinch is all done. 

Make sure it takes pride of place. You can hang it on the mantlepiece or under the christmas tree.

More Paper Plate Christmas Crafts You May Like

Using paper strips and glue you can make these beautiful paper plate christmas wreath that is fun for all to make.

Here is another kids Christmas wreath, simply make paper rolls and glue them.


  • Paper Plate Christmas Wreath


  • Kids christmas wreath


Paper plate hand bag

This paper plate hand bag is an easy and fun summer craft or valentines craft for kids

The kids will have fun cutting, hole punching, gluing and decorating this craft as they please.

Decoration can be done with any craft items you have at home.

You may use craft foam instead of paper, paper shapes instead of craft gems and strings instead of yarn.

Materials needed

2 Paper plates

Yarn (red)

Red paper

Scissors

Glue stick

Hole punch

Craft stones (optional)

How to make Paper plate hand bag

Put the paper plates together and a straight off the top.

Place the plates front to front and punch holes on the side.

Apply some glue to the edges and stick together making sure the holes are visible.

Insert the yarn in and out of every hole. Allow enough yarn long enough to make the bag’s handle. Then cut using a scissor and tie at the end.

Punch out shapes and glue to your paper plate bag. Decorate as you please with any craft items you have

You can also use adhesive craft gem stones to further decorate your paper plate bag

All done. Have fun crafting

More Valentines Crafts for Kids

Butter clothes pin craft


Kids christmas wreath

Easy Christmas Wreath Kids Can Make

This is an easy christmas wreath kids can make with paper plate. All you will be doing is cutting paper and gluing to decorate.

There are a few options to choose from if looking for how to make christmas wreath for kids at home or at school.

This printable christmas wreath colouring craft is a great preschool christmas activity

If making this christmas craft with preschoolers or preschool age kids, you could simplify this  by pre-cutting the paper and paper plate and just have them glue and decorate.

If this is to be done at school, give the kids creative license so they can design the christmas wreath in any way they want.

However, if this is to be done at home at with kids of varying ages, make it easier for th e younger ones.

For much older kids, try this paper plate christmas wreath.

To make a kids christmas wreath

Materials needed

  • Green coloured A4 paper (different hues)
  • Red paper
  • Paper plate
  • Scissors
  • Glue
  • Mini pom poms

Instructions

Cut out the bottom of the paper plate with scissors. You may use a circle cutter if you have one.

Cut strips of the green paper and the cut it in half

Apply gluon a strip and stick the ends together to make a paper roll

Make enough to cover the paper plate.

Apply glue to the paper roll and stick it to the paper plate. Cover the entire paper plate.

Decorate with pom poms or any decorative items you have.

Cut a strip of green paper and cut and stick a star shape or any shape.

Glue it to the back of the paper plate.

Cut a bow and ribbon or any kind of flourish and stick to the bottom of your paper plate christmas wreath.

Finished.


Paper Plate Christmas Wreath

A paper plate christmas wreath is a fairly easy paper craft for kids at home or at school.

This paper plate craft will enhance their fine motor skills and paper cutting and also put the kids creative skills to work.

The end result is beautiful and should take pride of place on any door.

Rather than hang outside, you may also hang indoors and use a christmas decoration.

This christmas craft involves simply gluing paper strips on the ring of a holed paper plate and decorating with whatever you have to hand.

If you are making a christmas wreath craft in the classroom, provide the kids with decorative items and challenge the kids to decorate in any way they want.

Use mini pom poms, paper shapes made with craft hole punch, craft gems etc

How to make christmas wreath with paper plate

Materials needed

  • 2 x Green A4 paper ( different shades of green if possible)
  • White card stock paper – for the ornaments. Print ornaments 
  • Paper plate
  • Pva glue
  • Scissors or circle cutter
  • Mini pom poms

Instructions

  1. If using scissors, make a hole in the middle. Cut from the middle to the edge of the base of the plate. Then cut around it. With a circle cutter, insert the pin firmly in the middle of the plate and adjust the blade to cut the bottom out
  2. Cut out 2cm strips of the green coloured paper. Make sure to cut the strips from the paper in landscape form.
  3. One strip at a time, apply enough glue. Insert the strip under the plate, glue side facing up. Glue both edges together.
  4. Press the strips against both sides of the plate so that the strips are not loose when the glue driesMake sure to glue the strips as neatly as you can
  5. Once paper strips have all been glued to the plate. Let it dry completely.
  6. Use the scissors to make small angular cuts to give your christmas wreath a festive look
  7. Print the ornaments on the white card stock paper and cut them out using scissors.Print ornaments here
  8. Decorate by sticking on mini pom poms or paper shapes.
  9. Stick on the paper angel and ribbon.

Your paper plate christmas wreath is now finished.

Hang it on your door, on the wall as a christmas decoration or on the window with front side facing out.

More christmas crafts

Toilet roll christmas tree

Christmas tree card


Exit mobile version