Easter Dot Painting

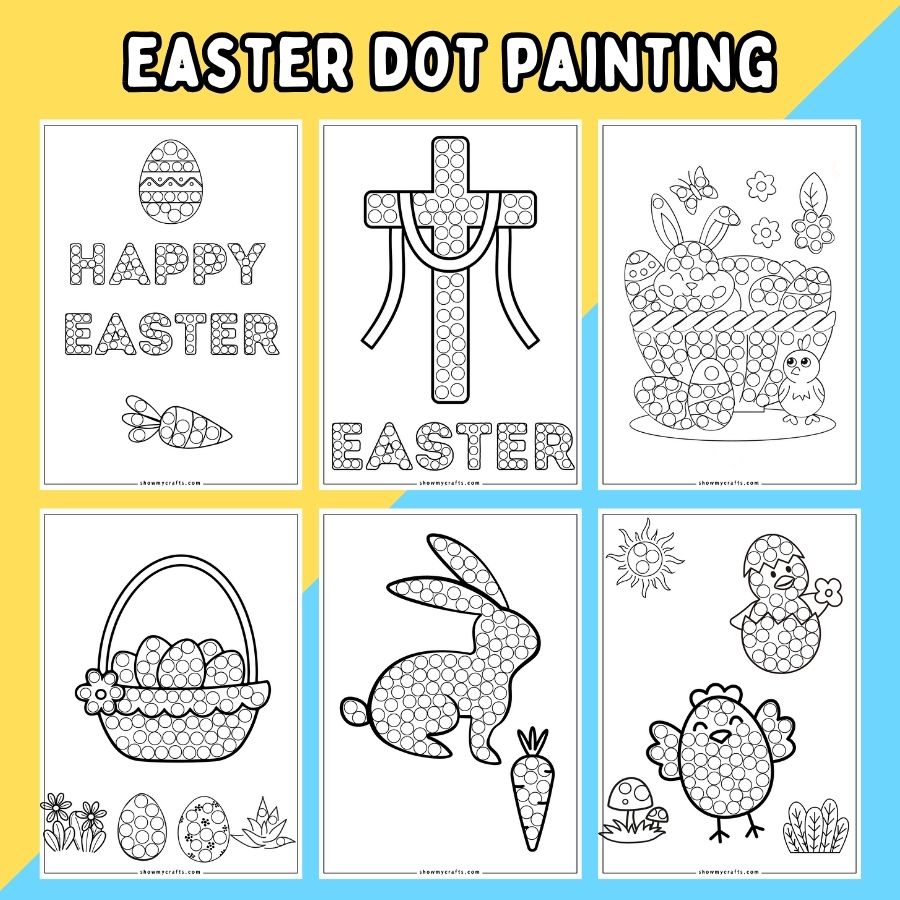
These Easter Dot Painting Activity offer a delightful, hassle-free activity to keep children engaged during the Easter festivities.

Feeling the Easter spirit already? Get ready for some Easter fun with these Free Easter dot painting printables!

Simply grab your dot markers, print out these easter activity worksheets by clicking the images below and let the fun begin.

Benefits of Dot painting

Dot painting allows children to express themselves creatively.

They can choose their own colors, patterns, and designs, giving them the freedom to create unique artworks. 

 Dot painting requires precision and control.

Children need to use small brushes or their fingers to make precise dots.

This helps improve their fine motor skills as they learn to control their hand movements, which can be especially beneficial for younger children who are still developing these skills.

The act of placing dots in the little circles helps children develop hand-eye coordination.

Dot Painting Activities You May Like

Numbers Dot Painting

Alphabet Dot Painting 


Easter Dot Painting Themes

Easter is associated with various themes and symbols, each carrying its own significance and charm. 

Some of the popular Easter themes and symbols include:

Easter Eggs Dot Painting: Easter eggs are perhaps the most iconic symbol of the holiday. 

They symbolize new life and rebirth. 

Traditionally, eggs were dyed in vibrant colors and exchanged as gifts.

The act of hunting for Easter eggs is a beloved Easter activity for children.

Easter Bunny Dot Painting: The Easter Bunny is a friendly, anthropomorphic rabbit who is said to bring Easter eggs and treats to children. 

It represents fertility and the arrival of spring.

 Children often anticipate a visit from the Easter Bunny and look forward to finding hidden Easter eggs.

Spring Flowers Dot Painting: Easter falls during the spring season, so flowers are a common theme.

Blooms like daffodils, tulips, and lilies are popular choices for Easter decorations and bouquets.

These flowers symbolize renewal, growth, and the beauty of nature awakening after the winter.

Cross and Crucifix Dot Painting: For Christians, Easter is a religious holiday commemorating the resurrection of Jesus Christ. 

The cross and crucifix are important symbols of Jesus’ sacrifice and triumph over death, making them central to Easter religious observances.

Easter Chicks Dot Painting: Baby chicks are a symbol of new life and growth.

They are often depicted alongside Easter eggs and the Easter Bunny, adding to the festive and springtime atmosphere of the holiday.

Easter Basket Dot Painting: The Easter basket is a practical and decorative element of Easter celebrations. 

It is often filled with Easter eggs, candies, and small gifts for children.

Baskets can be personalized and serve as a fun way to present Easter treats.

More Easter Dot Marker Printables

Get more of these easter dot marker printables in the members library here. More cute bunnies, easter candles and easter symbols with access to many more resources.


More Easter Activities 

3d Easter egg card

Easter Word Games

Paper Chick

Easter Chick Card

Easter Bunny Cutting Skills Activity

Easter Bunny Card

Complete Easter Dot Painting Printables

Gain access to all 11 Easter Dot Painting worksheets and more.

These printable worksheets are available to download in the members library.

Download the template from the library by logging in or becoming a member

Gain access to all crafts templates, colouring pages, maths and literacy worksheets and many more

Mother’s Day flower card

This mother’s day flower card made with pom poms  is a great craft kids can make as a gift or token for Mother’s Day.

The kids can wish happy Mother’s Day to mum while also having fun being creative.

This pom pom craft can be made for Mother’s Day with simple supplies. To make one, you will need the following supplies with the following instructions.

How to make Mother’s Day Flower Card

You will need

  • Pom poms (different colours and sizes)
  • Pipe cleaner (Green colour)
  • Scissors
  • Glue
  • Construction paper (Any colour)
  • Marker
  • Green paper

Create the base of the card by folding a piece of coloured construction paper in half.

Using the glue, arrange the pom poms in a circle. Make sure it is firmly in the centre to make space for the other flowers.

Cut the pipe cleaner using scissors to an appropriate length. Then glue to the bottom of the flower.

Repeat the above step with smaller pom poms to make smaller flowers

Place the flowers at the top and bottom of the card

Use the marker to draw small hearts all over the card.

Try to use a different coloured marker

Using a marker, write in the Happy Mother’s Day message on the inside of the card

Then add dots as a simple and easy decoration.

Have fun.

Mother’s Day Crafts you can also try

Mother’s Day Heart card

Flower photo card

Craft stick flower 

Easter Bunny Card

Put a smile on someone’s face with this simple printable easter bunny card. This cute easter greeting card is a very easy to make Easter craft for kids. Even better, it comes with a free template. Simply print out this easter bunny card template, cut it out and your message. This is a perfect token kids can give to their friends and family members during Easter.

It is really simple and straightforward making this easter bunny card. This free printable easter bunny card template allows you to simply print out, cut out and simply write your easter message on your card.

This is great for preschool age kids and above as long as they can hold a pair of scissors for cutting. The younger kids may need some supervision and it is ok if the cut isn’t clean. It is all part of the fun.

After cutting, all that is needed is to fold the card and then decorate. Give the children free will to decorate however they like with whatever they want.

The kids can keep it clean as pictured or use markers or crayons, glue pom poms, paper pieces etc

How to Make Easter Bunny Card

To make your card with the easter bunny card template, you will need the following

White A4 paper

Easter bunny card template (below)

Scissors

Crayon or marker (optional)


Print out the easter bunny card template.

The coloured or plain version.

If using the plain version, the kids can have fun colouring in the easter bunny on the outside and the Easter egg basket inside the card.

Cut out the template along the thin lines and the bunny faces on each side.

Fold the bunny faces back on either side in line with the edge.

Turn it over and fold each side in half to meet in the middle.


Go ahead and decorate your easter bunny card as you please. Write your Easter greeting on either side of the inside of the card.

Have fun crafting.

Easter Bunny Cutting Skills Activity

The kids will definitely have fun assembling this bunny cutting skill activity.

They get to develop fine motor skills through the scissors cutting motion while also having fun.

Perfect easter craft activity for the home or school.

They will enjoy the creative process involved which includes colouring, cutting, gluing and assembling the easter bunny on the page.

This activity involves cutting out the individual pieces of the bunny from the template and assembling them to form a complete picture of the bunny .

To put this activity together, you will need the following supplies

Print out the templates and cut out the pieces.

If using the black and white version, remember to have the kids colour in the bunny rabbit.

Using the glue, start to assemble the bunny to fit the picture

Glue in the ears first, then comes the head (the smaller circle)

Stick on the eyes, nose and whiskers.

Then stick on the bigger circle  and feet


More easter themed crafts

Easter chick card. Easy chick pop up card that kids will enjoy making

Easter word games. Enjoy free printable easter themed word search and puzzles


Easter Chick Card

Here is another pop up handmade card the kids will love. This Easter Chick card is one many easter craft ideas the children will be thrilled to make.

This 3d easter chick card is easy to make and can be assembled with or without a printable template.

Make a gorgeous pop-up chick card – as you open the card his little beak will open and then close again as it is shut.

This is an ideal easter craft for kids albeit the fairly older ones as this involves cutting out the parts of the card from the template. For the preschool age kids, you might have to do the cutting and then let them glue and decorate the card.

Some easter craft ideas you might like…

3d egg card

Paper chick craft

How to make a pop up Easter Chick Card

You will need the following

Yellow paper

White paper

Any other coloured paper

Scissors

Glue stick

Template (optional) 


If using the template, print out the circles on the yellow paper and the parts of the chick on the white paper.

Cut out each individual parts.

You will need 6 circles so fold the yellow paper in half making sure the printed side is on the outside. Then cut out the circles. Folding it saves you the time as you would only cut three times instead of six.

If you are not using the template,

Find a round object measuring 8cm in diameter, draw 3 circles on the 1st half of the yellow paper. Fold in half and the cut out the circles.

Cut out zig zag on measuring 3cm in height and 21cm in width.

Cut 2 L shapes for the feet and a triangle shape for the beak on an orange coloured paper. Cut 2 wings on a yellow paper.

Fold the six circle in half

Ready to assemble your easter chick card

Take the A4 coloured paper of your choice and fold in half so that it measures 21cm by 14.85cm.

Then fold in half  from left to right as pictured.

Glue the green grass to the bottom of the page

Start assembling the chick by gluing two folded circles to the card. One to the left and the other to the right.

Then glue the rest on top of each other.

Glue the wings, legs, eyes, and beak. feel free to decorate the inside of the card as you please.

Finished.. Your Easter chick card is complete.


Paper Chick

This paper chick craft is a very simple and straightforward easter craft for kids.

It is also makes for a great spring craft idea for kids.

You can make this paper chick craft for toddlers and preschoolers as it is just the right size for their little hands.

Another big plus is that it is a mess free no clean up craft activity

This paper chick craft could easily be done at home or in the classroom as Easter activities for kids.


You can make this chick craft as is instructed below or you could download a free printable chick craft template below.

Simply print and assemble.

Materials needed to make your Paper Chick Craft

You will need

  • Yellow card stock paper
  • Orange paper
  • Scissors
  • Glue
  • Wiggly eyes

How to make a Paper Chick

  1. Cut out two circles on a yellow paper. One 8cm circle for the body and a 3cm circle for the head. Or print the template and cut them all out
  2. Take the 8cm circle and fold it in half
  3. Take the 3cm circle and glue it to the semi circle. Make sure the curved side is facing down.
  4. Cut a small triangle in an orange colour and glue on the other side of the head.
  5. Cut two tiny L shapes for the legs and glue on the inside.
  6. Glue on the wiggly eyes.
  7. Using a marker, draw on feathers. Hey! You have made a paper chick

Get the free template

Here are some kids paper craft ideas

Paper princess crown 

Paper sunflowers

Paper alphabet cubes

Easter Word Games

Easter Word Games

Are you looking to add to the line up of easter themed activities for the family?

These easter word search and crossword puzzles will make a great addition to that line up.

All you need to do is print and hand out.

These word search, scramble and puzzles will suit children aged 6 and above. Even adults might find some these tasking.

Free Printable here

Easter Word Search Printables

Give the old grey matter a workout with these easter word games.

Easter Crossword Puzzles

Adults can join in the fun with crossword puzzles and some kids may need some assistance.

Add a bit of drama to the fun by timing the challenge and see who finishes first.

These crossword puzzles can used at schools, churches, clubs etc

Looking for more word games and puzzles? Try these

3D Easter Egg Card

Looking to make a simple easter themed craft?

Why not handmade and personalise a 3d easter egg card.

It is very simple to make with basic materials and is suitable for all ages.

The 3d egg is the centrepiece of the greeting card.

It can then be embellished with stones, shape cut outs, buttons and any craft accessory you fancy

How to make 3d Easter Egg Card

Materials needed

  • Paper stock cards (at least 2)
  • Glue
  • Scissors
  • Hole punch (optional)
  • Craft stones (optional)
  • Buttons (optional)

Instructions.

Print the  3d easter egg template on the card stock paper. You may print the egg templates on one side and the patterned background on the other side. The Blue egg and blue pattern as well as the Pink egg and pink pattern can be printed in the resource library

Cut out the egg shapes using a scissors. For a 3d egg that pops, you will need at least 5 cutouts.

Take a plain card stock paper and horizontally fold in half.

Glue on an egg cutout right in the centre of your folded paper.

Take the remaining egg cutouts and fold in half as pictured.

Glue the folded halves making sure they are glued on, the right side up  (ie the domed side up).

Repeat the step and glue the remaining two halves.

Decorate and embellish with craft accessories in any way that takes your creative fancy.

As pictured, you may use adhesive gold foam letters or even a felt pen for words.

Craft stones is a cheap way to embellish any craft project.


Another great way to decorate your card is with colourful buttons and hole punched shapes.


Your 3d easter egg card is complete

Free templates here

Please share this easter craft


Woven Paper Basket with Handle

Woven paper basket is a great craft activity for just about any level.

It is a great alternative to christmas stocking, can be used as party decorations or even hang it on a christmas tree.

Woven Paper Basket with Handle

Great as party decorations, stocking filler alternatives or as a christmas tree accessory.

Tools needed

  • 2 Different Coloured papers
  • Scissors
  • Glue
  1. Fold the papers in half
  2. Mark 2 cms either side of the unfolded side (opened side) and draw a horizontal to meet each marking
  3. Mark 2 cm intervals on the horizontal line
  4. Mark 2 cm intervals on the folded side
  5. Draw a line to connect each marking on opposite sides
  6. cut slits from the folded side to the horizontal line
  7. Weave the slits until complete


Subscribe for more videos

Need more paper craft idea? Here is one on how to make paper frills to elegantly present your lamb cutlets to turkey at any celebratory dinner.

Also try paper star crafts


Exit mobile version